Communities
Audience: This article is intended for community contributors
In Syntphony the content is organized through communities, which are essentially based on SharePoint sites. It serves to create a collaborative thematic space for sharing ideas and storing content, promoting communication between users. Among the functionalities of a community is the possibility of sharing multimedia content such as documents, images and videos, updating documents simultaneously among several users and always being up to date, accessing the most recent version of the documents.
Communities should be created with three important aspects in mind:
- The objective or mission of the community
- The users who will contribute the information
- The target audience that will consume the content
Taking these three aspects into account, two different types of communities emerge:
- Collaborative Communities: are those communities in which consumers are also content contributors.
- Communication Communities: are those communities in which contributors publish content to be consumed by users, which may be segmented based on certain parameters.
How to create a community?
There are two different options for creating a community:
- Create a community from scratch.
- Togify an existing community.
Create a new community from scratch
To create a new community from scratch, you may click on the search engine at the top of the page and select the option “Create a community”.
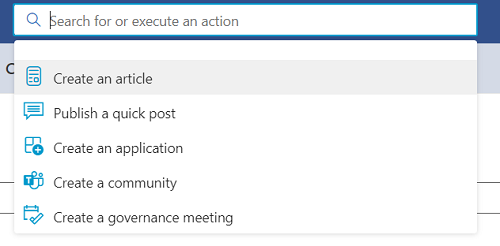
Once you have clicked on this option, the form that allows the new content to be created will open.
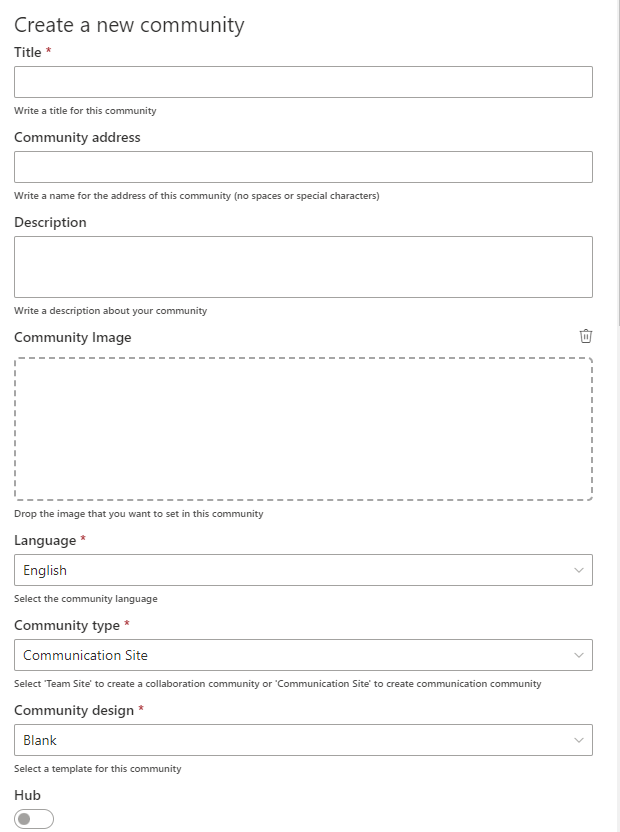
The form is composed of the following fields:
-
Title: This is a mandatory field that allows you to specify the title of the new content. -
Community address: This field allows you to specify the URL where the community will be hosted. If you do not fill in the field, the URL will be created automatically with the title - defined in the previous field. -
Description: This field allows you to provide a brief summary of what the community is. It will also help to locate and orient your visitors and members so that they know what they can find in the community. -
Community image: This field allows you to add an image, which will become the representative logo of the community. -
Language: This field allows you to indicate the default language of the community. The language can only be defined when the community is created, it cannot be changed later. -
Community type: This field is inherited from Sharepoint, where there are two types of communities: communicative and collaborative. This choice depends on the type of community you want to create, if the purpose is only to communicate, the community should be of the communicative type. If, on the other hand, the purpose of your community is to create a space with more functionalities, you should select the collaborative option.- Communication sites: Selecting this option displays the following forms:
- Site design: It applies to the design of the community being created and can have three posible values: blank, topic and showcase.
- Team sites: Selecting this option displays the following forms:
- Public: This option is disabled by default and enable the possibility of making the community public. The recommendation is to create private channels.
- Teams: Enabling this option enables a Microsoft Teams channel for this page.
- Communication sites: Selecting this option displays the following forms:
-
Community design: Syntphony offers you the possibility to automatically apply a pre-configured design template. This is a very useful option in case you want to duplicate communities with the same structure. -
Hub: This selector allows you to indicate whether this community you are creating is a parent community. -
Community hub: This text selector allows you to indicate the relationship of this community to its corresponding hub. -
Author: This field can be used to specify the person who published the community. By default, the profile of the person who created the content appears, but it can be changed to specify another person. -
Owners: With this field you can indicate the users who will be the administrators and owners of the community. -
Community Addons: This selector allows you to indicate which addons you allow to be displayed in the community. This selection can be further edited to suit the needs of the community. -
Audience targeting: This dropdown allows you to apply content segmentation according to audiences, previously configured as explained in this article.
Once you have completed the form and clicked on the “Create” button, the new community will be published showing the content specified in each field.
Togifying an existing community
In order to togify an existing community, please visit full instructions in the following link.
How to define the description of the community?
The description of the community can be specified in the creation form, but if not, it can be defined later in the community details.
The description should be a clear text that will help your visitors to know what content and information they will find in the collaborative space. This text is displayed in the description tab, so a short text with keywords will draw the user’s attention to the community.
How to configure user permissions?
As a collaborative space, communities can be visited by different users in different roles:
- Owner: can make changes to the community configuration
- Member: can add content to the community, it is the right role for content contributors.
- Visitor: this role allows users to visit and interact with the content, but not to configure or edit it.
Which aspects of the community can be edited?
Once the community has been created, its design can be customised through different elements located in the header.
- Header image: an image can be added from your computer to customise the appearance of the header.
- Community logo: an image can be added to serve as the community logo.
- Community navigation menu: the top menu can be edited to achieve an optimal result and aligned with the objectives, to facilitate the navigation of the users in the community
With these elements configured, the members must carry out design and layout work on the homepage so that it displays the desired contents and information. There are pre-configured templates to establish and organise the information, but if a greater personalisation of the site is desired, the homepage can be organised from scratch.
The layout of the sections is done by columns, and the content can be divided between one and three columns, playing with the different widths of each column.
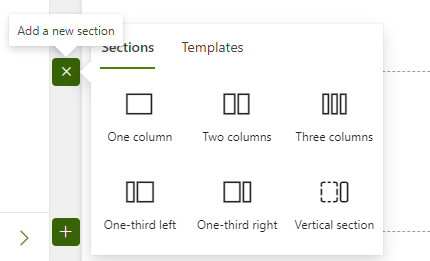
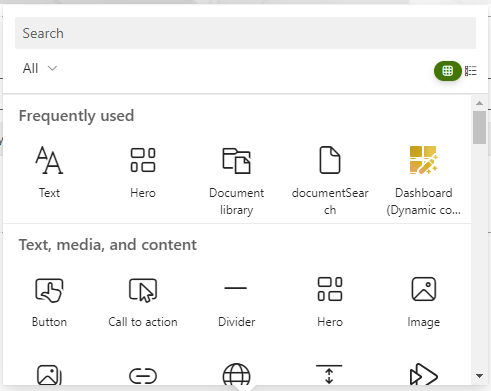
Once the structure of each section has been established, different elements can be added in which to display the information.
How to specify the language of the community?
Communities must have a default language, but using the Multilanguage tool you can integrate several pre-configured languages in which to display content. You can find more information about the Multilanguage tool by clicking on this link.
How to delete a community?
As specified above, communities must have a purpose and a mission. Therefore, it is possible that the objective to be achieved by the community may have a specific duration in time. Therefore, it is possible that once the objective has been achieved, the community created may need to be deleted.
To delete a community, it is necessary to delete the SharePoint site on which it is based. There are 2 posible ways:
- Through site settings
- Through site information
Remove from site settings
- Browse to SharePoint settings button (wheel button) on the upper-right hand side of the screen.
- Click on Site contents
- In the site contents page, find the button for “Site settings”.
- In the site settings page under “Site actions” section, find delete site button, click and accept.
Remove from site information
- Browse to SharePoint settings button (wheel button) on the upper-right hand side of the screen.
- Click on “Site information”.
- Click on “Delete site”.